Faded Shabby Blogs

07 October 2012

Baby booties!!

I don't know about you, but baby showers are just a delightful event in my mind. Having been privileged to have had five baby showers (and only two children; yes, we were spoiled!), I can attest that people like baby showers much more than they like bridal showers. It's always fun to see how people at the showers react to games - I was at one where, blindfolded, guests had to compete to try to match socks (different sizes, no problem; different colored bands on different sizes? Yeah...right). One woman spent her entire game time just holding the little socks to her cheek and cooing about the time when her children fit into such precious little socks. That was the same event at which they had a piƱata in the shape of a bear. That thing came back to smack me in the face, and we all joked that the headlines would read, "Bear mauls woman in the woods." We were a little off the beaten path at a retired colleague's house.

But I digress. I've taken on some fun and wonderful challenges this year (meaning academic year), with new roles in every organization to which I belong. I'm becoming more involved. AND I was even hired recently to make baby shower favors.

Here's a snapshot or two:


The "It's a Boy" banner had more embellishments before I actually shipped it off. One booty was filled with kisses that spelled the baby's first and middle names (Aidan Ryan), the other had his last name spelled out on kisses. And I just couldn't resist making "yo-yos" out of the zip strips off the Wonderland  B&T papers I used to cut the booties and the banner pieces.

My many thanks go to my friend who thought enough of my paper crafting skills to allow me to be a part of her daughter's baby shower in this special way! I had such fun using my new CTMH Cricut Artiste cartridge to make these booties. If you'd like to learn more, let me show you how!

01 August 2012

Cricut Artiste will bring out your inner artist!

I'm so excited to get to share with you the latest in the Close To My Heart-Cricut exclusive cartridges: Artiste Cricut Collection. This set features a cartridge designed by CTMH, three Dimensional Elements chipboard sheets, and three coordinating stamp sets. The cartridge is like none I have worked with before (and I've had my Cricut Expression for nearly four years and own dozens of cartridges - although I'm going to admit that I've sold some since CTMH came out with its first Cricut Art Philosophy Collection a year ago)!

The 700 shapes feature 3D flowers, boxes, and objects (oh, there's even a pair of baby booties - can you imagine these adorning the centerpieces of a baby shower?!), cards and envelopes, shapes, tags, a font, phrases. There are one-key themed sets to create the invitations, favors and decorations for a party (Halloween, birthday, Valentine's Day). Something I really love is that this cartridge is set up with linked keys, and those are designed to pair perfectly in relative dial size. If you select a 4 inch card and cut its coordinating envelope, the two will fit perfectly together (no fussing and recutting one or the other!). If you want a 3D box to stand 3 inches in height, you set your dial to 3 inches, and the finished product is that size!

I have already made two birthday presents using the new Artiste cartridge, both using the L-key mini album. (That's right...all the pages of the album are made using a combination of the L key, shift, and feature keys!) In the instruction booklet, it has in red by the back cover ("3D Object" feature, "SHIFT" + L) "3 in.", with an arrow to show that the finished album will be three inches in height if you select that. I made the first album using this standard. I was curious how "large" I could cut this back cover, using only a 12x12 piece of cardstock and the Fit to Page feature on my Cricut. The tallest this particular album (complete with front and back covers) could be is 4 1/4 inches. (Note: the back cover will ONLY cut if you select "Fit to Page", as it scoots out the side margins a bit. All other pieces were able to be cut by setting the size to 4 1/4 inches.)

I used the Dotty for You papers for the second (larger) mini album, which is for our niece's birthday. My husband leaves in the wee hours of the morning for a business trip within an hour of his sister's new home, so he'll visit her family while out there! And today I put together this album. (If I had been thinking far ahead, I might have had lots of stamping within the pages. But Riley is turning 7, and I'm sure she can create whatever she wants to see adorning her pages! Plus, this is a new cartridge...but it's helping me dust off my creative edge!)

Below is the outside of the album. You can see that it is about 8 1/2 inches wide too. It's a good sized mini album. I hope Riley has some fun filling it with photos and memorabilia! Oh...that rosette on the closure? That's one of several rosettes included on the Cricut Artiste. It cuts decorative edges, different shapes out of each one (this has beveled edges, two diamond cut-outs) AND scores with precision. Our B&T papers work great with this feature!


Here is the inside of the front cover, with a little "envelope" like an interoffice kind (flap opened) and tags within. I've always loved office supplies...now I can create miniature versions of them out of any papers in no time!!

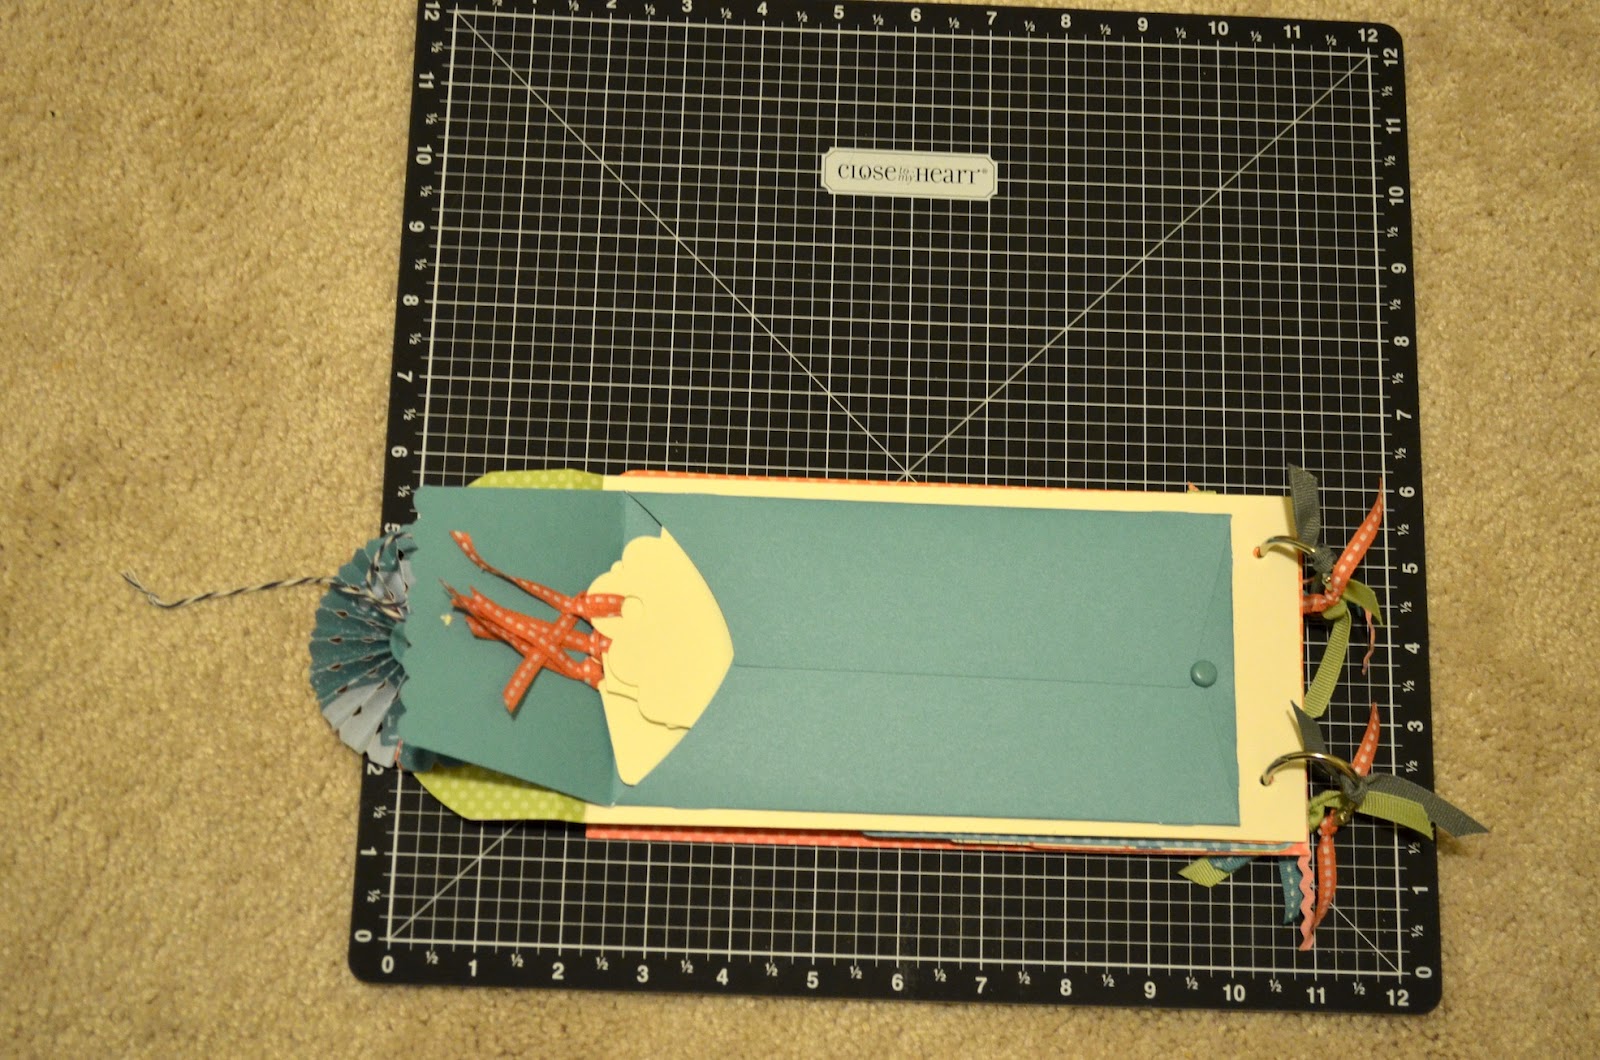
Here's the side showing all the cuts, each perfectly cascading. The shapes are sometimes so fussy, I would never cut them (the first), or so artistic (the second) I would fail. This photo also shows the underside of the rosette and my closure (these are thin craft magnets, but I'm just kicking myself for not having ordered the small hook-and-loop dot closures CTMH carries. I had magnets flying across the room from polarity issues when I was trying to line everything up! Plus I don't really like having magnets everywhere...perhaps that paranoia is old, but it's in me).

I wanted to show a couple of the pages opened/turned. My decision to use the front or back side of our B&T paper was partly just trying to break up the patterns when you look at the entire album. But in some cases, it made for a coordinated double-page spread!

I put some tags within the pages (adhered to the page, not just in the envelopes). This is one, and a little ribbon detail. This is actually hiding the backside of a brad that was used for the envelope closure on the back!

Here's the envelope on the back, with CTMH Baker's Twine in Outdoor Denim wrapping between the stitched button and the brad. I didn't want to use another set of magnets, didn't yet have the hook-and-loop dots, and had adhered this envelope before I devised the closure.

One twist of the Baker's Twine and the envelope opens to reveal more tags for journaling and capturing memories! Before I spend too much more time here, I should take my hubby the album so he can pack it for Riley! (If he forgets it, I can always ship it...we have enough time for that!)

Hope this helps you get excited to see this new product! The Autumn/Winter Idea Book is live as of today...check it out on my OBA and let me know if I can answer any questions about our new products!!

19 June 2012

Convention Studio J Assignment

I think I've spent plenty of blogspace extolling the virtues of Studio J, the Close To My Heart digital scrapbooking studio. But our corporate creative staff have really helped me to go from loving this tool to being ecstatic over it! I feel like a bit of a heel for not having explored more of what I could be doing with Studio J. I knew SOME of the things that I was assigned to do...but really, I've been a "lazy" user of Studio J.

I have accepted the kits as they are assembled, utilized the toggled embellishments that I personalized with various colors. I've changed out the color scheme of a paper, rotated pages. But OH MY! There is more! I'm grateful for the opportunity to have received 5 Studio J layouts as part of my Convention 2012 registration, but I feel something beyond gratitude for the techniques I learned in following the instructions in order to get the following layouts. Of course, I made them my own, changed titles, added journaling and my photos. But what I learned along the way...priceless! I know I'll still make some Studio J pages as they are "presented", when I'm short on time or maybe demonstrating how quickly I can achieve a completed layout. But I can see that I'll be creating even more personalized pages that reflect this new knowledge!

I'm sharing only three of the five, because the other two have other people's children in the pictures. And...well, I don't have the go ahead to share their faces on my blog (I could probably obtain that from the friends who are their parents, but I am just making my life simpler here).

Above is the layout done with the Lucy paper pack. We toned down the femininity of this pack with a few color changes, a more neutral B&T selection, and these multi-colored streamers rather than flowery accents. Vincent has a place with this paper too!

I cannot believe that the above layout begins with the Mischief paper. That was our tribute to Halloween and autumn in 2011. I LOVED learning to crop My Stickease and layer elements to create those cupcakes on a table in the upper left part of this layout!

I thought I was going to find some Fourth of July, Memorial Day or military photos to go with the Victory paper pack. While these pictures are from the Independence Day weekend, our experience with the Wooden Boat Festival is not necessarily "patriotic". I enjoyed mixing the flavor of the paper with a different life experience. And I like the effect in the lower right portion of layering a text box over a 'watermarked' embellishment. It adds to the depth of this layout! And I can't achieve the same with my printer or my handwriting...

I'm eager to learn more!

05 June 2012

MIA in May, apparently

An entire month escaped me. I apologize. It might be the combination of Mother's Day (which seems that much more difficult to "enjoy" without my Mommers here) and Memorial Day (away from my dad, for whom this is a charged day both professionally and personally; made harder in that my Mommers is buried in the Great Lakes National Cemetery alongside many fallen soldiers).

I apologize for anyone who clicked over here and wondered where I was. I can't even say that I've been whipping up a load of crafts. Right now (5 June) I am thinking of end-of-year teacher gifts to show appreciation and what I will do to keep my precious little Vs from making me batty with their bickering. I guess I should return to reading "Siblings without Rivalry" and listen to a few more CDs on practicing "Love and Logic". And I should get to work on my projects for Convention 2012. I've got a Studio J assignment from CTMH. And I have roomies...

Hey, I still have a few gifts I need to ship out based on a promise that I would send homemade items to people. And thank you notes to get to my friends who helped me when I couldn't walk or was too sick to cook. It's been a bad spot these past couple of weeks. Made worse by a little virus called Hand, Foot & Mouth Disease. I particularly loved the CDC information page that indicated that there are people out there with this who have absolutely no symptoms. No wonder it spreads. Fear not, I've had every symptom. In spades. So at least you know not to kiss me!

Let's see if I have some image worth posting before I close. I've got a visual side too! Nothing to do with paper crafting, but more with my purpose. Here we are, celebrating Mother's Day by taking a hike on Squak Mountain. I really appreciated that both my Vs were able to manage it on their own feet. And I also appreciated the great brunch we had at A Terrible Beauty in Renton. For me, the day was about spending time with my family. But I want to be a little "productive" when we're together. The hike was a good way of combining these goals. (The Sunday Bloody Mary Sunday at brunch was a good way to remember some other things too!) In case you're wondering, I changed between brunch and the hike. I think we all did, except maybe Matt's shirt....

28 April 2012

Saw Similar on Etsy

I've been spending too much time dallying on Pinterest (but really HAVE been doing things I saw there, from baking new recipes to making my own laundry detergent and shower cleaner). Yesterday a good friend sent me a text message asking if I had those little wine glass labels. I had several sets. Where have they gone? Did I get rid of them? Are they still packed?

Well, I had seen something on Etsy months ago. And I thought, "I can do that." And for cheaper than what the vendor was charging. But I get it...we all have to make our profits where we can. The ones I saw for sale were a plain scalloped circle in your choice of colors. I knew I had plenty of white CS, asked my friend what colors she would like to see on the wine glass labels, and selected some purples, as she requested.

I used the Cricut Art Philosophy flower#5 to cut a 2 1/2" flower then used another cutting system to cut the center holes (it really is good not to get rid of every other tool just because I adore the Close To My Heart products so much), random stamped some flowers (from a long-ago Aspiration stamp set; still one of my favorites) in Amethyst and Gypsy, leaving enough white space so people could write their names. Then I made a slit at a weird angle so the stem of the glass could slip in but not so easily slip out. Here's what the "final" product looked like:


I can see having fun at future parties. It's really quite easy to customize them for the type of party. Thanks, Etsy vendor, for the idea!

22 April 2012

In progress

Was it more than two years ago that my friend Sally Simon showed up with a bag of photo frame inserts and said, "I think you might be able to do something with these!" They have moved three times since that day. But I hadn't forgotten them. And just recently, I actually started to DO something with these terrific tidbits that I just couldn't let find their way into the recycling bins before I had a chance to repurpose them. These are still in progress. Because I have some ideas but they aren't fully formed. Here are the pictures, thus far. The first one is the back side of the insert, showing that one could hang this from three sides or use the stand to prop it up on a desktop or shelf.

I inked the edges of this one. What was I thinking? I should have used Staz-On ink as the surface was semi-glossy. But this was an item that would have been discarded by any other. It's trial and error. Even with my errors, I will probably still display it. I'd hate for anyone to think I can only show total success (let's face it; I'd never have anything displayed if I were waiting for that!)! 

I used my own version of decoupage glue (yes, that's Elmer's with some water added in; stock up when it's back-to-school time!) to adhere the Key To My Heart paper I had trimmed to fit the front of this insert. It's only been three or four years since this paper was the CTMH National Scrapbook Month limited-edition paper. But I loved it so much I managed to procure several packs. You might have noticed this paper on some other projects I've done. Because I am STILL using it up! (It has some of my all-time favorite colors: Sorbet, Juniper, Creme Brulee, Tulip; and it looks awesome with my number one favorite color, Cocoa. You might think I was hungry when I selected my favorites. You could be right about that too!) I swear this is the last pack I have of this paper, and it's almost gone. We'll discuss my stash of Perfect Day paper some other time.

I was looking through some little container and found these three roses that I had created (from the Art Philosophy cartridge, of course) and distressed. All made from Key To My Heart papers. What had I intended to do with them? Perhaps it was merely an effort to practice making 3D roses. Perhaps I was going to create hair clips out of them or brooches to put on something. I have no idea. But they were hot-glued to this frame insert. My thinking was that it will be so much easier for me to see the end of my hoard of this paper if I could look up on the walls in my craft studio and see a little sample of it. Do any of you think it would be too much for this room to be painted Sorbet? Because that is really what I want. Or maybe I should go Creme Brulee on three walls and have an accent wall of Sorbet? I digress. It's a tendency of mine. I added some Creme Brulee ribbon to cover a bit of the flawed direct-to-frame inking of Cocoa that I had done on the edges. Somehow, I think it works. The piece needs something more. Perhaps a frame of some sort with a terrific sentiment stamped or pieced onto it. I haven't yet decided, so it waits to be completed.

This one was the first I attempted, with the new CTMH cardstock-weight Background & Texture paper from the Stella collection. I had wrapped this around the edges of the frame (cumbersome with the heavier paper...but it does give it a different finish that I like). I intend to cut some of the flowers like I had done on Elliana's weekly calendar (gift) and then perhaps put a chipboard piece letter E so I could send this to her parents to adorn her room. 

Here's the side of this one. Ooh...I'm so pleased that I had this ribbon in a collection of Chocolate ribbons. I love the rouching on it, and it just finishes off my awkward edges so perfectly! Elliana might not get this. After all, the colors are close enough to my faves; I might just want this to stick around! Oh wait...I'm trying to cull my belongings. I'll post when I get this done!

One last one, still with that Key paper. I'm thinking about cutting out little squares and then creating a crossword-like pattern to put all the names in our family. I saw something like this where they were Scrabble pieces. I just don't want to go through the effort to create all that. This definitely needs embellishing, some sort of interest. I could make a third panel to go with the first pictured item and have the three be one cohesive design. I'm just not sure. I might get bored if it's all in my face. But I'd like to use my paper crafting to do some decorating around the house. Just to try that out! I'll report back to you when I know better what I'm doing with all these bits and pieces. It's not just all final product, as you well know!

06 April 2012

Posters Made Easier with the AP Cricut Cartridge!

I've made no secret of the fact that I have rarely changed my Cricut cartridge since I purchased the CTMH-exclusive "Art Philosophy". It is such a versatile set, with brackets and scallop-edged shapes, flowers and butterflies, 3D boxes and flowers. What else could I need?!

On occasion (a very rare one; so much so that I've even started selling off the cartridges I don't see myself using in the foreseeable future) I have changed it out for something specific. This time it was an Easter bunny/basket shape. Eggs (and layers of ornate decorations of them) are covered on the AP, just not the basket and bunny.

The awesome mothers' support group I stumbled into in the week prior to moving to our rental home in October 2010, St. Madeleine-Sophie Mothers & Others, puts on an Easter Egg Hunt for children each year, the Saturday before Palm Sunday. My good friend is the coordinator of the event, so she asked me if I could possibly replace the hand-drawn posters that had never been laminated. Keep in mind, folks, the event happens rain or shine, so some kind of weather protection is a must even for the signs!

I'm always happy to help my friends, and this is what I came up with for our sign:

This photo was taken on the eve of the poster's lamination. And I made two different strips indicating the possible room for refreshments and laminated them separately, so we could easily change our location (must tell people where the coffee and donuts are going to be!) if either room is scheduled by another group.

Despite the rain, the day was awesome! I'd post pictures of the event, but there are dozens of children in the photos and I wouldn't post those without permission from parents. I'm wacky like that! Seems like there is a science fair coming up...I should see if my hubby and son want to hire my services!

30 March 2012

Countdown to Convention 2012!

logo

Only left until Convention 2012 in Dallas, Texas!

I’ll be craftin’ 9 to 5 at Convention! Join me at the party of the year!

19 March 2012

In honor of my Mommers: a Tip Junkie link!

It's Tip Me Tuesday in the Tip Junkie Community, and I've linked up last year's Knight Training Birthday Party for Vincent (I'm number 301 in the projects, so you know there's all sorts of good stuff happening there). Tuesday would have been my Mommers' 70th birthday...it was a milestone she had wanted to reach, just "to see a seven in the tens place on my cake," she often said. She didn't get to see that here, but now I believe she has a great view of everything we do. And she's in her perfect form. S'agapo, Mommers from your Beetsies.

For whatever reason, my ability to put a cute little linky button to the blog is impaired. So I'm going old school and just will give you the link:

http://www.tipjunkie.com/homemade-projects-320/

Enjoy!

18 March 2012

CTMH How-To Books are Retiring - get yours while supplies last!

Please note that the How-To books are retiring (Reflections and Originals are already unavailable). I find these books (and the still-available but in limited supply Cherish, Imagine, Wishes and Magic books) an essential tool in sparking my creativity. I think I've admitted to you all that I'm much better at CASEing than creating, and these books allow me to do so with confidence. There are "blueprints" for each card or layout, cutting diagrams and tips and techniques throughout these books. "Magic" offers many interactive elements that can be incorporated into cards as well as scrapbook pages. "Wishes" boasts three card workshops that allow you to create multiple cards from very little paper - and the frugal me loves these! (I have used these card workshops to create holiday cards, sympathy cards, and general cards to have on hand. I love having variety from which to choose, and I love completing a nice set of cards quickly!)

Hurry...these books are only available while supplies last! You can order them at JuliAnne.MyCTMH.com and begin (or continue) creating confidently in no time!

15 March 2012

Getting Organized

Spring is approaching, and with it the desire to get things cleaned and organized. In the winter, I saw a great book display case being sold from a local toy store. I sent the Love of My Life a picture and asked about buying it for the Vs' play room. It would be great to help us get organized. Someone at work was selling some storage stuff; would that do, he asked. What he suggested was significantly cheaper and lighter to move; who was I to argue?

So we've had these three storage things in the play room since just before Christmas. There are a total of 42 little cubby spaces in them. Each cubby measures about 5 inches high and a little less than 7 inches wide, perhaps just a little deeper than the width. These little open cubbies would do nothing but take the toys vertical, making the mess that much more obvious to my eyes. I mulled over the options.

I'm a big fan of storage totes or little cubes. But I've seen none that small, and the units themselves aren't sturdy enough to have anything hanging out the front of the cubbies. And canvas totes are pretty pricey. I thought about sewing some, but there's my fear of using a sewing machine (yes...I *said* it! I have a small anxiety attack at the thought of firing up the sewing machine, but I love hand stitching and embroidering things...long story). I decided to make little "drawers" to function to hold the items.

And of course, I turned to paper. My love of Close To My Heart paper is deep, but the card stock is 65-pound paper; I needed a little sturdier if it would survive the Vs and their friends playing. I found a source that had flat rate shipping (paperandmore.com) and selected their dark chocolate 105-pound card stock with a smooth finish. It arrived yesterday, and I set to work. I had already done my measuring to configure square "drawers".

I ordered 12x12 paper, scored each side 2 3/4" from the side (9 1/4" from the right, so I only had to make one turn) and then folded all the folds, like so:

I cut to the intersection of the score marks on two opposite ends (and then, because I like making extra work, I cut an angle out of the tab that was created so I wouldn't have any edge issues when I folded in the tabs). I applied adhesive and then assembled the box. I'll admit to using a Stampin' Up! punch to get two rectangular holes in the "front" of the drawer and also on the tags I cut for the labels. I used the CTMH Art Philosophy Cricut cartridge, rectangle 6 cut at 1 3/4" height in CTMH Bamboo card stock. I contemplated how I would do the labels - stamp, print...I chose to write them with a Sharpie. I'm not expecting these to last forever, and I wanted to get this project DONE! I cut some bulk ribbon I bought from ribbonsandbowsohmy.com some time ago to 5 1/2" lengths. I could have "spared" a few centimeters with each tie by keeping the ribbon on the roll and cutting after the knot was tied, but I was feeling reckless today so I cut the ribbon first (after determining the shortest length I could knot and not have much excess to trim). I placed the label (also punched with the SU punch) over the holes in the front of the drawer and fed the ribbon through, like so:


I tied a simple knot and then trimmed the edges (not that they won't fray with usage by the Vs, but I like to start clean). You'll note that my label isn't necessarily straight or centered. And I'm okay with that. Frankly, this is better than what we have currently (large plastic bins all over the room, partially filled with various toys). Here's my tied knot and trimmed ends:


I'll admit here that I haven't completely decided on all the labels. So I've given myself permission to make this post and go to bed without having assembled all the boxes and gotten all the items into their little storage bins. I need to cull some plastic bins from Mr. V's room (currently sitting on the "shelves" of his head board) to make room for a selection of books to reside on those should-be bookshelves. There are knights and horses, superheroes and villains residing in those bins. If I move those to the play room, his room can be restricted to LEGOs and books (and a few stuffed animals that currently hide in some fabric bins). Ms. V's room seems to have books, babies and stuffed animals. Oh, and some dress-up stuff (but I don't think I want kids tempted to change clothes in the basement, so I'll let her have the additional category). Here are a couple of pictures of what I could see and clearly identify. Or so I thought. I have to rethink the "animals" bin. Or we need to reduce what we're keeping, which is the more likely reality!


You can see the animal overload. Some of the little bins haven't been filled yet. I still have things to find that have migrated to the Vs' rooms (without my caring enough to get them back to the play room). I was able to determine that one entire tea set needed to be eliminated; the plates were too big for the drawers I crafted. I'm certain the Vs will be excited when they learn that their stuff needs to fit or it needs to go. My goodness, I'm starting to sound like one of my heroes, my SIL. Hey...if you haven't checked out her blog lately (or ever), I highly encourage you to give her a read: www.theb-blogs.blogspot.com. I promise you'll find yourself laughing!

I know I've mentioned a number of other products I used on this project, but you know my passion remains paper crafting with purpose with Close To My Heart products. Today, CTMH launched our new Online Business Addresses. I hope you'll go take a look at what exciting tidbits are there! If you haven't already created an account through my website, I encourage you to do this at my OBA. Especially if you'd like to start getting a monthly newsletter to rev your creativity, which I'll begin sending April 1! No foolin'! My new site is julianne.ctmh.com.

25 February 2012

Some cards

I'm a great fan of card workshops. Something I love about the CTMH How-To books is that the card layout books include some card workshops. These are great time savers, idea originators, and are also conservative on paper. I love them! (I also love scrapbook workshops, and have gathered a few developed by other consultants to maximize a series of layouts in one paper - often getting as many as 18 from one Level 2 paper pack!)

Consultants sometimes develop their own card workshops too. The following was devised by another consultant, Becky Lehman, and utilized the Miracle papers. I elected to make these as sympathy cards, and sold them to a friend in need of too many of this variety.


The insides of the cards complete or contain the full stamped messages of sympathy, such as "so sorry", "thinking of you", "sending prayers", and "with deepest sympathy". The box is a Vicki Wizniuk design. I wanted my friend to have a lovely box even after the cards were depleted!

03 February 2012

Repurposed Wreath


Well, I'm exaggerating here. One part of this wreath is repurposed: the base. With the "holidays" behind us, I've returned to the concept that I should be cleaning and organizing, opening and emptying boxes. Doing so has turned up quite a bit more packing paper the movers used to protect our items. I was trying to put some aside when I noticed that with a bit of turning, it took on this shape:


Obviously, it wasn't going to stay that way on its own. Where was that colored duck tape I used to mark all our rooms? It's in the garage, in a reusable shopping bag. It was unable to be found in a timely fashion, but while looking, I found another inexpensive adhesive (significantly less expensive, indeed, and I believe quite suited to the task) and used it. That adhesive is:


masking tape! I suppose you would have figured that out without the product placement. 3M-Scotch can thank me later. I tore off smallish pieces and wrapped my rough paper heart. I needed a somewhat sturdy base but didn't want to go spend money on this. (I'm certain my husband would argue that the consumables that we actually purchase, like adhesive, cost us enough money. But I had a vision! And a purpose: to repurpose items already in the house!)

There's a slight cheat to this mentality. I had some red paper, even some pink paper. But not enough of either. I was already placing an order to be shipped; I added a pack of the Light Red & Pink Shade Pack card stock (with Tulip, Hollyhock and Blush papers, so beautifully coordinated!) to the tune of $7.95. But I only used 3 sheets of each (the pack comes with four sheets of each), so I'm really only out $6 retail (and I get a discount). Suffice it to say, a foam wreath probably cost more than this AND I would have had to buy paper anyway. AND to buy the heart already made, well...that would be silly! Because I could make it!

I used my fantastic Cricut Art Philosophy cartridge to cut the 3D flowers. I set my dial to 2.75" and used the Auto Fill feature; 16 flowers were cut (with very little waste) on each sheet. Here's what the cutting mat looked like after a sheet was done:


My photography skills need improvement, I know. But I'm just trying to make sure you have some visuals peppered between my wordy paragraphs! Here are some of the cut flowers, as they look when peeled off above cutting mat:


You need to curl them up. This time I decided to use a glue gun (gasp) rather than Liquid Glass. I thought it would set a little faster (and I have an entire package of glue sticks just waiting to be used up...all this feeds my Use It Up Challenge too!). I got my rhythm perfected; I could roll a flower and have it glued and set in about one minute. When those minutes would have been spent just prowling Pinterest for a project or sitting down for some mommy screen time, I feel they were well worth it! (I may have been faster than that. I just know I had a certain amount of time before I had to fetch Mr. V from school and the number of flowers I assembled was about equal to the minutes.)

I also used the glue gun to adhere the flowers onto my wreath base. Here's the wreath in progress; I just love how the trio of colors offered interest. (BTW: I'm not really skilled with the photo editing program on this computer; I don't know that any of my photos show a true color for these three. Tulip has long been in my top 5 colors from CTMH; there is a hint of blue in this which makes me think Valentines whereas the Cranberry has a touch of orange and makes me think Christmas. Hollyhock is un-pink enough that I like it well. Ms. V adored the Blush, because that's "really pink" in her book. And pink still rules with my little princess.)


I debated how to affix a ribbon for hanging. Just put a loop on the back? Should I have adhered ribbon around the base before I put flowers on? I'm certain that I could have gone any number of ways. I decided to make my hanging options many and varied and went with a simple strand of grosgrain glued to the back of the heart, like so:


Yeah...it's a little blurry. And it's another completely different set of options for the colors. And perhaps you will notice that my flowers sometimes show gaps. I'm hoping that people coming over don't have to wait so long outside as to dissect this attempt at some holiday decoration on the front door. I just hope to offer a little inspiration. Maybe they'll ask me to show them how! That would be fun!

22 January 2012

A few more Studio J layouts

I know you might wonder, "Why does this woman, who claims to be a paper crafter, LOVE Studio J so much?" If you had asked me six years ago about digital scrapbooking, I would have scoffed. About five years ago I tried it for the first time. It was with a company (I'll allow it its anonymity) that had a required number of pages before you could set to print (or you'd end up with blanks at the end) and it was a hardcover book with full color glossy print pages. It was a gift for my husband for Father's Day. It was an incredible keepsake. Although I felt pressured by the number of pages I had to complete in a short time, I got it done and was pleased with the results.

And then a child looked at the book. Not my own child, but one of my nieces. They were lovingly turning the pages. And I noticed little creases in the page and that the ink was kind of rubbing off where there were creases. So after that little look, I put the book back in its protective sleeve and have kept it there. It only comes out under strict supervision. Because I meant for it to last, and it is clear it isn't going to.

The thing I love about scrapbooks is that they are meant to be handled. They are intended for visiting and revisiting memories. When we moved into our new house, we moved into the family room this piece of furniture we bought last year with a bunch of other items from some guy on Craigslist. It happens to be a type of a bar - with spots for glasses to hang, a retracting board from which to serve, drawers to store corkscrews and other items associated with a bar, and two wine rack grooved levels at the bottom. The feet of the stemware we have doesn't fit in the spot to hang the glasses, so it can't function that way. It had turned into a strange catch-all in our rental. But placed into our family room - in a spot I can see from the kitchen while preparing meals and from the table we eat most of those meals - I couldn't stand the idea that it would just gather clutter. I formed a hypothesis and then I tested it. Lo! The area where the glasses should hang perfectly fits my scrapbooks!

So I placed the scrapbooks I have thus far made in that area. There are some from other companies (I think all paper crafters and scrapbookers dabble in everyone's products at least for a time). There are books of traveling I have done solo or with my husband and family. There are some with photos from weddings I've attended or have been a bridesmaid (I did that 10 times, after all!). There is even one entirely devoted to my husband because I just couldn't stand knowing his photos were in envelopes in a box. Since I have placed them in this spot, not one week has gone by without the Vs pulling out that little bar drawer to "take an order" for which book we'd like to look at today. It is so much fun exploring our shared history - and the history before their time too. It's a way to stay connected with family in another state or those who have passed away (always too soon, it seems). I remember one scrapbook consultant sharing information about how, "Your scrapbooks should live where you live." It's true in my house now, and I love it.

But sometimes I am so engaged with what is happening in our lives or even trying to paper craft some little 3D project or some other excitement of the moment (drat that beloved Pinterest for showing me so readily all sorts of projects I should try!), I started neglecting my scrapbooking. When Close To My Heart introduced Studio J, I was skeptical. Then I tried it. It's so easy. I can do as much or as little as I want at a time. I can put together pages entirely out of sequence and then place them in the right order in my book. I can rearrange. My goodness, I even took the JPG image I get as a Studio J member and made my new home announcements by having the store print 4x8 prints (they do it for cards) - AND I got the envelopes for the low price! I have a full size printed layout that matches my announcements, as members get the JPGs for free with a print (which only costs me $6.50 for two 12x12 pages - or I could buy the JPG alone for $3). [For the remainder of January, Studio J members get the tenth layout FREE after purchasing nine layouts!]

With Studio J membership I also get free shipping once a month, so that gives me a little incentive to get at least four layouts done every month. I hate wasting money. :) Having a monthly deadline helps me keep "current" with my scrapbooking. And the Vs really love seeing the latest pages added to the books!

Of course, I gave myself an added deadline of finishing my layouts before the end of January. I didn't want to feel pressured next week. So here are some of the latest layouts, from November and December 2011 [there are a couple of great ones I've omitted as they have friends' children pictured and I haven't asked permission to put them on my blog]. If you haven't yet tried Studio J, go to my website (you can get there from www.ctmh.com/JuliAnne and click on the Studio J link). You just create an account (email and password), upload a few photos (or skip this part and go right to setting up layouts), and go! It's pretty easy to navigate, but I'm happy to show you how! I love that I can change the colors of any papers (I can't do that with real paper) and can easily add coordinating embellishments (without having to store extras), but perhaps my favorite part is that Studio J resizes my pictures to fit into the wells on the page (AND I can edit those pictures to improve color, soften wrinkles, even whiten teeth and correct blemishes!). Or maybe I love best looking at a collection of photos for an event and saying, "There are seven," and then clicking on the drop-menu for examples of layouts with seven photos (or two or fifteen) and seeing the options. That really eliminates a lot of brain work.

I'm babbling. I promised JPGs. Please forgive. You see, I'm passionate about Studio J! I hope you feel it!