
30 January 2011
29 January 2011
Valentine's Banner
I'm going to admit that I have never been a lover of Valentine's Day. Perhaps it was a childhood with all birthday gifts influenced by Valentine's-themed items (my birthday is the week prior). Perhaps it was what felt like an eternity of being single. Who knows? I just wasn't into it. But I am excited about the trend of banners. And the Mothers & Others group I'm in is having a Valentine's party for the kids, so I volunteered to make some decorations. I'm going to share my process here!
First, I cut some "chip board" I had to the triangle shape of a pennant. CTMH has pre-cut, pre-hole-punched banners for sale, but I needed more letters. The flaw of my method (besides the time to cut, measure, etc.) is that the product I used is much flimsier than the CTMH banners, so it's prone to warping. But I did use up some stuff I've been hoarding, so that is good!
Next, I decided on my papers. I am trying to use up the stock of stuff that I've just been holding on to. So some of my papers are older. If they contained Tulip or some shade of pink, they were on the block for this. I used Jingle, Cherry-O, and Amore. I also introduced some of the NEW Sophia paper too! I have some OCD issues, I think, so I had to plot things out. All the As would have to have the same paper. As I only had three different sets I was using, I decided the As and the I would be on the same paper combination. The Es and the Ys would be on the same. The consonants would be on the same paper. I began by tearing the papers into strips, like the following picture shows. I also used a water brush to "paint" water on to the edges of some of the pages and roll them, to expose the backside of the paper and add some other dimension to the project.

In order to make things easy for me, I decided to adhere the papers to some Baby Pink base pages I had (still part of my hoard). These have their own patterns, but they would mostly be covered up by the torn pages. Still, any exposed parts would show something more interesting than just a solid color.

The next two photos show the paper adhered to the base page(s). It was a little random, sometimes using the "front" side of the paper with more vibrant colors and sometimes using the "back" of the paper, which has a mono-tone pattern in a percentage of the color on the front. I really wanted to have the layers shown. The second picture also shows some of the rolled edges.


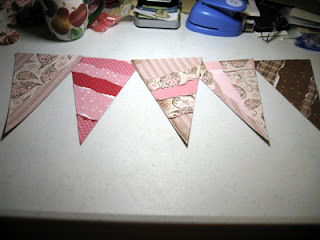
Next, I adhered the pennants onto the back of the base page in "random" patterns so that I got maximum triangles on the back and would create banners with a variety of patterns of diagonals, verticals, and horizontals. I specifically didn't want each one to be symmetrical (mostly because this would show any flaws in my work!). Here are some of the pennants before I started decorating them:

I needed to organize the "patterns" so that there would be variety as the words were constructed. Planned randomness? This is part of my OCD...
Then I started decorating. I punched holes and set eyelets to reinforce the holes and attached the pennant flags with Hemp. I used a variety of embellishments (all from my hoard...yep, I'm using them up!) to create different dimension and interest on each triangle of the banner. I used my Cricut to cut out the letters in Tulip CS and then ran them through a texture embossing folder. (Actually, Verona helped me while Vincent was in the pool for swim lessons at the Y.) I inked each letter with Chocolate ink on a sponge applicator and adhered them with 3D foam tape. Here's what the banner looks like strung up by the fireplace in the living room of this terrific house we are renting:

And here are some close-ups of the details. You can see that I made some accordion paper flowers (this is in the Sophia paper that premieres on February 1), some scallop circle flowers (CTMH introduced a punch for this too!), have used some Dimensional Elements (the hearts) decorated with pearl paint mixed with Tulip re-inker for some color and sparkle, buttons, Sparkles, ribbon. I might go back and ink the edges of each pennant with Chocolate, but right now I'm just going to enjoy this! It's my first banner. And I'm addicted! Am excited to make more using the CTMH banner, because it was tedious cutting the bases myself (and then they curled up a bit when I attached the papers).


First, I cut some "chip board" I had to the triangle shape of a pennant. CTMH has pre-cut, pre-hole-punched banners for sale, but I needed more letters. The flaw of my method (besides the time to cut, measure, etc.) is that the product I used is much flimsier than the CTMH banners, so it's prone to warping. But I did use up some stuff I've been hoarding, so that is good!
Next, I decided on my papers. I am trying to use up the stock of stuff that I've just been holding on to. So some of my papers are older. If they contained Tulip or some shade of pink, they were on the block for this. I used Jingle, Cherry-O, and Amore. I also introduced some of the NEW Sophia paper too! I have some OCD issues, I think, so I had to plot things out. All the As would have to have the same paper. As I only had three different sets I was using, I decided the As and the I would be on the same paper combination. The Es and the Ys would be on the same. The consonants would be on the same paper. I began by tearing the papers into strips, like the following picture shows. I also used a water brush to "paint" water on to the edges of some of the pages and roll them, to expose the backside of the paper and add some other dimension to the project.

In order to make things easy for me, I decided to adhere the papers to some Baby Pink base pages I had (still part of my hoard). These have their own patterns, but they would mostly be covered up by the torn pages. Still, any exposed parts would show something more interesting than just a solid color.

The next two photos show the paper adhered to the base page(s). It was a little random, sometimes using the "front" side of the paper with more vibrant colors and sometimes using the "back" of the paper, which has a mono-tone pattern in a percentage of the color on the front. I really wanted to have the layers shown. The second picture also shows some of the rolled edges.


Next, I adhered the pennants onto the back of the base page in "random" patterns so that I got maximum triangles on the back and would create banners with a variety of patterns of diagonals, verticals, and horizontals. I specifically didn't want each one to be symmetrical (mostly because this would show any flaws in my work!). Here are some of the pennants before I started decorating them:

I needed to organize the "patterns" so that there would be variety as the words were constructed. Planned randomness? This is part of my OCD...

Then I started decorating. I punched holes and set eyelets to reinforce the holes and attached the pennant flags with Hemp. I used a variety of embellishments (all from my hoard...yep, I'm using them up!) to create different dimension and interest on each triangle of the banner. I used my Cricut to cut out the letters in Tulip CS and then ran them through a texture embossing folder. (Actually, Verona helped me while Vincent was in the pool for swim lessons at the Y.) I inked each letter with Chocolate ink on a sponge applicator and adhered them with 3D foam tape. Here's what the banner looks like strung up by the fireplace in the living room of this terrific house we are renting:

And here are some close-ups of the details. You can see that I made some accordion paper flowers (this is in the Sophia paper that premieres on February 1), some scallop circle flowers (CTMH introduced a punch for this too!), have used some Dimensional Elements (the hearts) decorated with pearl paint mixed with Tulip re-inker for some color and sparkle, buttons, Sparkles, ribbon. I might go back and ink the edges of each pennant with Chocolate, but right now I'm just going to enjoy this! It's my first banner. And I'm addicted! Am excited to make more using the CTMH banner, because it was tedious cutting the bases myself (and then they curled up a bit when I attached the papers).


16 January 2011
That flower...
That flower on the "Smile" card is one that caused me great consternation. Melissa Laverty, at fancymelissa.blogspot.com, had an awesome youtube tutorial on it. She calls them pinwheel flowers, if you go in search of hers. There has been debate. Many believe they are fan flowers. Let's just call them flowers and you can fill in your descriptor.
I can't always access youtube (so tired of that "error" message), so I created some flowers and took pictures and put instructions along the way. Allow me to share. I like to print off these kind of things and keep them in a techniques folder/file/binder so that I can get my instructions when I'm away from a computer. Yep. I'm old school like that. You might even notice that I put two spaces after my end sentence punctuation. It's amazing that I can blog...what with all this old-fashioned technology training in my brain!
 First, start with four equal-sized squares. They should be the same size as the final flower you would like to create (four 2x2-inch squares will render a 2-inch circular flower). (Photo above shows the square/circle; photo below shows four squares.)

Next, accordion fold each square. These folds should be of equal size (or you will have an uneven flower) and be crisp folds. A bone folder is handy to have. You don't HAVE to score the pieces before folding. If you really need the folds to be measured, go ahead and score. I just eyed them and they came out okay.

Next, fold each square in half.

Put some strong adhesive (I used Scor-Tape here) on one of the inner sides of this folded accordion square. Then adhere it together, creating a fan that is one-quarter the circle.
 Do the same with the remaining three accordion folded squares. Then put adhesive on one of the outer sides of the fan and adhere each quarter to the other.
 This next photo shows all four pieces together but not adhered on the last side. That is the trickiest part, if there is one in this whole thing. You want to secure the adhesive but not ruin your accordion folds. Nimble fingers help!
 The final product: it's really much easier than I thought it would be. And these are so "on trend" (as the trendy now say) that they should really be in your repertoire. Add them. The CTMH paper gives you an option to use either side. I wanted a brighter color for my project, but this Wings paper looks elegant on the other side too. Should have taken a picture of that! Darned hind sight!
 Again, check out Melissa's video to see this in action. I credit her with the instructions. I just need to see stop action stuff for my own purposes...
I can't always access youtube (so tired of that "error" message), so I created some flowers and took pictures and put instructions along the way. Allow me to share. I like to print off these kind of things and keep them in a techniques folder/file/binder so that I can get my instructions when I'm away from a computer. Yep. I'm old school like that. You might even notice that I put two spaces after my end sentence punctuation. It's amazing that I can blog...what with all this old-fashioned technology training in my brain!


Next, accordion fold each square. These folds should be of equal size (or you will have an uneven flower) and be crisp folds. A bone folder is handy to have. You don't HAVE to score the pieces before folding. If you really need the folds to be measured, go ahead and score. I just eyed them and they came out okay.

Next, fold each square in half.

Put some strong adhesive (I used Scor-Tape here) on one of the inner sides of this folded accordion square. Then adhere it together, creating a fan that is one-quarter the circle.


15 January 2011
Swap Spoiler Alert!
For each new Idea Book release, my awesome CTMH upline, Michele Gamble, hosts a new product card swap. I'm posting some of the cards I've made for this now, using some new product (some of which will not be available until February 1). If you are interested in any of these stamps, check out my website, JuliAnne.MyCTMH.com. Or send me a message. I'd love to show you how I made these...pretty easily!


You might guess that I'm excited about the new spray pen, which helps me let go of the need to make everything look so "perfect". It sprays a random pattern, and that makes for exciting artwork! Gives it a real energy, don't you think? I'm also excited about the return of last year's National Papercrafting Month paper, Miracle. Wahoo!
These cards represent a personal challenge for me. I'm trying to USE the embellishments I've been hoarding for perhaps years. I see something, it looks cool. I must have it. Then I want to keep it. One of my resolutions for this new year is to use it up. Enjoy its look on cards, layouts. Don't just hoard. I've been donating boxes (and boxes) to local charities, filled with household items or clothes that we no longer use or never did. Sadly, I had to send to the recycling center some UNUSED Tupperware (real, brand-name Tupperware, bought in the day when it was only sold at a home show) that was in a container in a wet basement in Michigan so long that the moldy smell could not be removed. For shame. Wasted money, and wasted time and energy in storing and transporting it. I shall not be doing this with CTMH embellishments. They will be used! Look for them!
And look for me to be more of a blogger. :)
Subscribe to:
Posts (Atom)